Hitting Drills to Fix Lunging
Baseball and Fastpitch Softball
This Hitting Drills to Fix Lunging article is excerpted directly from our new book The Ultimate Hitting Training Guide (click for book details).
For recommendations on how and when to use various training methods (dry, heavy bag, pylos, tee, toss, live, machine, etc.) and to shop for effective and durable training equipment click on the link Hitting Training Methods and Aids.
Table of Contents
Hitting Drills #1 – Head Centered During the Swing
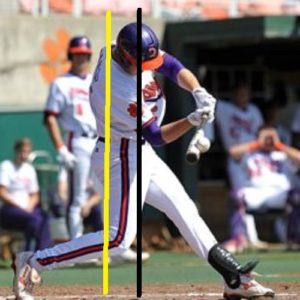
Head centered denotes the hitter stabilizes their head as they move out to toe touch. It is an absolute hitting fundamental to maintain the head relatively centered between feet as the torso moves linearly toward the pitcher. The hitter must control their upper body (stay back) by not allowing their shoulders and head to travel toward or over the front foot (lunging).
All ages of hitters hit more powerfully and productively when they fix lunging!
Purpose – Improve vision and power.
Attention Focus – Internal focus (click on the link to learn how to utilize various attention focuses to improve practice) on maintaining the rear eye centered between feet.

Mike Trout’s Head Centered
Directions –
First, use dry swings, then a batting tee, and lastly, front toss. Beginning in the stance, the hitter moves into hitting position and stops. The hitter freezes and looks straight down with their rear eye (right eye for righties, left for lefties); the back eye should be centered over a spot halfway between their feet. Now the hitter completes their swing and again freezes, checking that their rear eye remained centered. If the back eye moves toward the front foot more than a couple of inches past the middle of their feet, they are lunging. Block practice head centered for fifty swings and at multiple practices.
Hitting Drills #2 – Axis of Rotation Drill
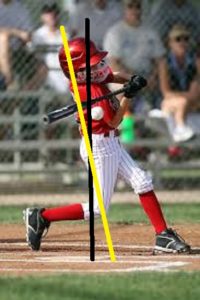
Scientifically, define rotation as a circular movement around an axis. Universally, High-Level hitters establish a rearward leading axis of rotation to:
- Maximize the torque of core rotation.
- Create a slight upward gradient in the swing path.
Purpose – Deliberately develop a rearward leaning axis of rotation in the hitter’s baseline swing.

Mike Trout’s Rearward Leaning Axis
Directions –
In this drill, the hitter uses three different methods to train rotational axis.
Method 1 (Block with Noodle)
Attention Focus – External Process focus (click the link for how to use mental focus to improve practice and performance) on staying behind the noodle – let movements “self-organize” (click for details of a useful training method).

Use a batting tee. The hitter assumes their balanced, athletic stance. The coach holds a long swimming pool noodle in front of the hitter’s helmet, blocking their head from moving too far forward. After the hitter gathers weight rearward, the noodle is held the same distance in front of the hitter’s head as the distance of the hitter’s stride. For example, if the hitter strides out three inches, hold the noodle three inches in front of the hitter’s helmet. Ask the hitter to hit the ball off the tee without their head coming in contact with the noodle. The hitter establishes a firm front leg at front heel drive and controls their upper body to avoid lunging into the noodle. Ask the hitter for 25 hard hits without touching the noodle.
Method 2 (Rear Eye Test)
A valuable check for the hitter to use ongoing is the “rear eye test.” The hitter controls their upper body as they approach, with the head centered between feet, so as not to “drift” over the front foot.
Attention Focus – External Process focus on a centered head – let movements “self-organize.”
Use a batting tee. Ask the hitter to hit the ball off the tee and then freeze. They now look straight down with their front eye closed and rear eye open. Have them point at the spot on the ground directly below their back eye. If the hitter points to a spot more than two inches past the middle of their feet, they are lunging and fail the rear eye test. Ask the hitter for 25 hard swings where they pass the back eye test.
Method 3 (Torso Extension Test)
Establishing the torso as a direct extension of the front leg creates a dominant torque position. Universally, the torso and front leg are on the same linear axis. The hitter feels rotation occurring around this axis, while most weight resides on the front foot.
Attention Focus – External Process focus on upper body in-line with front leg – let movements “self-organize.”
With this third method, again, use a batting tee. Ask the hitter to hit the ball off the tee and then freeze. Ask the hitter to observe whether their torso, front leg, and front foot are all in a straight line. If not, the hitter is lunging forward with the upper body and head to some extent. Ask the hitter for 25 hard swings where they pass the torso extension test.
Hitting Drills #3 – Axis of Rotation Experimentation Drill
Purpose – Experiment with different degrees of rearward axis to learn how trajectory (launch angle) is affected. Determine the most productive degree for the specific hitter.
Attention Focus – External Process focus on the position of the rear eye between the feet at contact.
Here are six common degrees of rearward leaning axis and the corresponding position of the rear eye (used by experienced hitters):
0-degrees

5-degrees
10-degrees

15-degrees

20-degrees
25-degrees
Here are some guidelines for fitting the degree of rearward tilt at contact to the type of hitter (High School and above):
- Zero-Degree Axis (Contact Hitter) – Rear eye two inches forward of center.
- Five-Degree Axis (Contact Hitter) – Rear eye centered.
- Ten-Degree Axis (Gap Hitter) – Rear eye two inches behind center.
- Fifteen-Degree Axis (Gap-Power Hitter) – Rear eye four inches behind center.
- Twenty-Degree Axis (Power Hitter) – Rear eye six inches behind center.
- Twenty-five Degree Axis (Homerun Hitter) – Rear eye eight inches behind center.
Step 1 (Measure the Hitter’s Baseline Average Launch Angle)
Directions –
Click on Launch Angles in Your Cage for how to set up launch angle markers in your cage.
Use a batting tee, front toss, or pitching machine aimed waist-high. Ask the hitter to hit 25 balls using maximum effort swings. Only count hard-hit balls. Add up (subtract for ground balls) the launch angles for each hard-hit ball as follows:
- Hard-hit ground balls (-5 launch angle).
- Hard-hit flat line drives (0 launch angle).
- Hard-hip gap drives (0 – 20 launch angle measured by cage markers).
- Hard-hit flies (20+ launch angle measured by cage markers).
Average Launch Angle = Total of Launch Angles on Hard-Hit Balls / Number of Hard-Hit Balls.
Step 2 (Degree of Rearward Axis Experimentation)
In this step, the hitter picks one (new) degree of rearward tilt to try out. Before evaluating the change in game-like conditions (Step 3) the hitter must first get comfortable with the new movements.
With the new position, the hitter first takes 25 swings using a static heavy bag, to get comfortable with the new position. The hitter hits the bag and freezes. Then, have the hitter close their front eye and look straight down with their rear eye (rear eye test). Ask the hitter how far from the center of their feet their rear eye is at contact. For example, for a moderate 10-degree tilt, the rear eye is hovering over a point two inches rearward of the center. The coach can help the hitter evaluate the degree of rearward tilt at contact by comparing the hitter to the images (above).
Once the hitter is accurately obtaining the experimental degree of rearward axis, repeat Step 1 to determine how much the average launch angle has been adjusted.
Step 3 (Evaluate Productivity)
Directions –
The hitter takes swings in live batting practice and during scrimmages to determine if the new degree of rearward axis fits the type of hitter they are.
Potentially, the hitter might make axis adjustments to their baseline swing. Caution, though, when bat speed is still developing, moderate to large tilts can result in a high percentage of flyouts (to learn more about how to customize launch angle for the unique hitter click on the Optimize Launch Angle Drill).
Step 4 (Build and Confirm Baseline/Automaticity)
Directions –
After evaluating the new positioning in BP and with live pitching, proceed with a permanent change (if desired) by:
- Using a batting tee, front toss, machine, and live BP, for at least 400 swings to build automaticity for the adjusted axis.
- Then, use game-like pitching and slow-motion video to confirm the swing change has “truly” become a part of the hitter’s new baseline swing.
Building Rome Series Books: Building the High-Level Swing Series
 Click Building the High-Level Swing Series to learn more about our new two-book hitter series containing a detailed and comprehensive description of 100 hitting fundamentals and 140 step-by-step drills that efficiently construct the batting swing from the ground up.
In the Building Rome Series of books, the construction of skills are in functional order, providing a “roadmap” to becoming a great hitter.
All baseball and fastpitch softball players can “climb the Roman Coliseum steps” to become powerful and productive hitters.
Enjoy the quest!
The axis of rotation terminology gets a little scientific – hope you are good with it. Submit a comment (no email required) or send us any question using our contact page and we will get right back to you. All the best – Gary.
Can you be more specific about the content of your article? After reading it, I still have some doubts. Hope you can help me.
Thanks for sharing. I read many of your blog posts, cool, your blog is very good.
Your point of view caught my eye and was very interesting. Thanks. I have a question for you.
Your point of view caught my eye and was very interesting. Thanks. I have a question for you.
I don’t think the title of your article matches the content lol. Just kidding, mainly because I had some doubts after reading the article.
Thanks for sharing. I read many of your blog posts, cool, your blog is very good.
Thank you for your sharing. I am worried that I lack creative ideas. It is your article that makes me full of hope. Thank you. But, I have a question, can you help me?
Your article helped me a lot, is there any more related content? Thanks!
Thanks for sharing. I read many of your blog posts, cool, your blog is very good.
Your point of view caught my eye and was very interesting. Thanks. I have a question for you.
Thanks for sharing. I read many of your blog posts, cool, your blog is very good.
Your point of view caught my eye and was very interesting. Thanks. I have a question for you.
Just logged into q88dangnhap the other day. The interface is clean, and navigating is a breeze. Give q88dangnhap a shot! q88dangnhap
Your point of view caught my eye and was very interesting. Thanks. I have a question for you.
Alright, checking out juwa6.info. Seems like they’ve got a decent setup. It’s not too shabby. Could use some improvement, but overall not bad. Check out juwa6 for yourself.
Looking to download epiwingame? The epiwingamedownload.com site looks pretty straightforward. Download went smooth. Give epiwingamedownload a try if that’s what you are looking for. No issues so far, so it seems pretty solid.
Alanodt5game.com. Site loads, the games seem pretty simple. If that’s your thing Give alanodt5game a try!
Your article helped me a lot, is there any more related content? Thanks! https://www.binance.info/cs/register?ref=OMM3XK51
Thank you for your sharing. I am worried that I lack creative ideas. It is your article that makes me full of hope. Thank you. But, I have a question, can you help me?