Batting Stance Posture Experimentation Drill
Baseball and Fastpitch Softball
This Batting Stance Posture Experimentation Drill article is excerpted from our new book The Ultimate Hitting Training Guide (click for book details).
For recommendations on how and when to use various training methods (dry, heavy bag, pylos, tee, toss, live, machine, etc.) and to shop for effective and durable training equipment, click on the link Hitting Training Methods and Aids.
Note that the products discussed on our site have been used in our training of hitters with great success. At no extra cost to you, things you buy through our links may earn us a commission.
.
Table of Contents
Experimentation in a Nutshell
Before making evaluations and comparisons between different swing strategies, it is crucial to first build a comfort level for the swing change, including timing adjustments. But the hitter avoids practicing the experimental change so much as it becomes habitual – they may not choose to adopt the change. After analyzing metrics, try the swing changes in game-like conditions and, based on the results, decide whether to deliberately habit-build. Creating automaticity for the new batting adjustment is the final step.
Batting Stance Posture Experimentation Drill
Coaches cry out “stand tall” or, conversely, “be athletic.” How a hitter executes their transition from stance into launch position affects momentum and seeing the ball.
Purpose – Experiment with various degrees of athleticism in the hitter’s stance to determine the most powerful or productive.
Review –
- Click the link for how to Measure Bat Speed.
Attention Focus – First, use an Internal focus on assuming different postures in the stance and then switch to an External Process focus on swinging the bat fast, allowing transitional movements to self-organize (click The Magic of Mental Focus for Hitters for how to use mental focus to improve practice and performance).
Step 1 (Measure Power with Upright Posture in Hitting Stance)
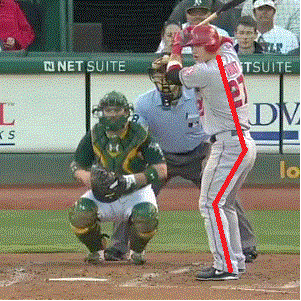
Upright Stance: 10 degrees Spine Angle
Narrow Width of Feet
Slight Knee Bend
Straight Back Side
More Head and Shoulder Movement Required to Transition to an Athletic Hitting Position
Although most experienced hitters are nearly upright in their stance, they increase their inward spine angle and knee bend as they transition to hitting position (see images above).
Directions –
Use a heavy-hitting bag to begin. Ask the hitter to take their stance with a 10-degree spine angle and only a slight knee bend (image top). As they gather, the hitter “sits back,” moving into a more athletic position with a 20-degree spine angle and increased bending in the knees. The hitter’s head drops and moves in toward the plate (image above). Ask the hitter to sit back, in tempo, and then hit the heavy bag hard. Repeat until the hitter feels a powerful rhythm.
Next, repeat the same athletic transition for 50 swings using front toss. Again, wait to do speed measurements until the hitter has a moderate comfort level with the new transitioning method.
Small changes to the hitter’s swing movements, or in tempo (pace), or the barrel’s speed, translate to significant timing impacts. Use a pitching machine or live BP until the hitter is comfortable transitioning and makes solid contact towards the middle of the field.
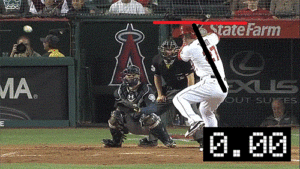
Now the hitter is ready to do analysis. Measure peak and average overall bat speed when transitioning from an upright stance (click the link for how to Measure Bat Speed).
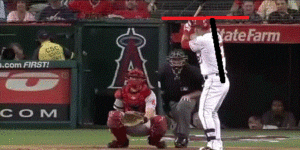
Step 2 (Measure Power with Athletic Posture in The Batting Stance)
Athletic Stance: 20 degrees Spine Angle
Athletic Width of Feet
Moderate Knee Bend
Straight Back Side
Simple Transition to an Athletic Hitting Position (without affecting vision)
To increase simplicity, developing hitters can utilize a spine angle of twenty degrees in their stance with moderate knee bend (athletic).
Directions – Use the same process as in Step 1 to develop feeling, comfort, timing, and then measure overall bat speed when transitioning from an athletic stance.
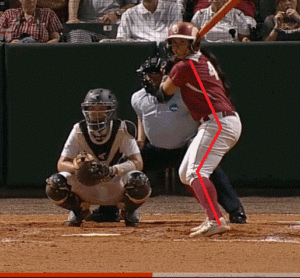
Step 3 (Measure Power with Crouched Posture in the Batting Stance) – OPTIONAL

Directions –
Use the same process as in Step 1 to develop feeling, comfort, timing, and then measure overall bat speed when transitioning from a crouched stance.
Step 4 (Game-Like Test)
Directions –
For each of the three stance postures, allow the hitter at least three at-bats to evaluate vision, feel, and power under game-like conditions in a situation where the pitcher is trying to strike the batter out. Expect issues with confidence, timing, and off-speed when facing competitive pitching with relatively unfamiliar movement patterns. Step 4 aims to weigh any batting issues arising from new stance positioning against increased power or productivity potential.
Step 5 (Build Automaticity/Baseline for Posture in the Batting Stance)
Use the bat speed metrics combined with the game-like results to decide whether to move ahead with habituating the posture change in the hitter’s stance. If a change is to be made, construct baseline automaticity (click Make a New Hitting Habit) by performing the stride and approach drills (find drills in Tool XI: Universal Stride and Approach Drills of The Ultimate Hitting Training Guide).
Building Rome Series Books: Building the High-Level Swing Series
 Click on Buiding the High-Level Swing to learn more about our new books containing a detailed and comprehensive description of 100 hitting fundamentals and 140 step-by-step drills that efficiently construct the batting swing from the ground up.
In the Building Rome Series of books, the construction of skills are in functional order, providing a “roadmap” to becoming a great hitter.
All baseball and fastpitch softball players can “climb the Roman Coliseum steps” to become powerful and productive hitters.
Enjoy the quest!
Submit a comment (no email required) or send us any question using our contact page and we will get right back to you. All the best – Gary.
Thank you, your article surprised me, there is such an excellent point of view. Thank you for sharing, I learned a lot.
Thanks for sharing. I read many of your blog posts, cool, your blog is very good.
I don’t think the title of your article matches the content lol. Just kidding, mainly because I had some doubts after reading the article.
I don’t think the title of your article matches the content lol. Just kidding, mainly because I had some doubts after reading the article.
I don’t think the title of your article matches the content lol. Just kidding, mainly because I had some doubts after reading the article.
Thanks for sharing. I read many of your blog posts, cool, your blog is very good.
I don’t think the title of your article matches the content lol. Just kidding, mainly because I had some doubts after reading the article.
Can you be more specific about the content of your article? After reading it, I still have some doubts. Hope you can help me.
I don’t think the title of your article matches the content lol. Just kidding, mainly because I had some doubts after reading the article. https://accounts.binance.info/da-DK/register?ref=V3MG69RO
Your article helped me a lot, is there any more related content? Thanks!
234winlogin. That’s the spot. Easy to use interface and payouts are usually quick. Not bad if you are looking for straight forward fun. 234winlogin
That’s a solid point about team dynamics! Seeing how Fairplay Login handles secure accounts & fast payouts (via GCash etc.) is impressive. Definitely checking out fairplay login slot for some action – smooth registration is key! 🔥
Great article! Security is key when choosing an online casino – especially with platforms like 999 phl link prioritizing KYC & safe deposits. It’s reassuring to see sites taking those extra steps for players like us! 👍
Ahaa, its fastidious dialogue about this piece of writing here at this website, I have read all that, so now me also commenting at this place.
I really like it when individuals get together and share ideas. Great site, stick with it!
I am sure this post has touched all the internet viewers, its really really good post on building up new web site.
I’ll immediately clutch your rss as I can’t find your email subscription hyperlink or newsletter service. Do you’ve any? Kindly let me understand in order that I may subscribe. Thanks.
I’ll immediately snatch your rss as I can not find your e-mail subscription hyperlink or newsletter service. Do you have any? Kindly permit me know in order that I may just subscribe. Thanks.
Peculiar article, totally what I wanted to find. cheap jerseys
It’s very effortless to find out any matter on web as compared to books, as I found this paragraph at this web site.
Hãy bắt đầu hành trình chinh phục đỉnh cao cùng 888slot link ngay hôm nay. Thành công của quý khách chính là thước đo cho uy tín của thương hiệu chúng tôi. TONY02-02O
Generally I don’t learn post on blogs, however I wish to say that this write-up very pressured me to take a look at and do so! Your writing style has been surprised me. Thanks, quite nice post.
Welcome to this ultimate site for online gaming, magicbet casino, [url=https://play-magicbet.org/]magicbet[/url]! With thrilling games, attractive bonuses, and a intuitive interface, it offers an amazing experience for players. Join today and leap into a world of infinite fun and rewards!
Can you be more specific about the content of your article? After reading it, I still have some doubts. Hope you can help me.
I simply couldn’t leave your site prior to suggesting that I really loved the standard information a person supply to your guests? Is gonna be back ceaselessly in order to check up on new posts
I’ll right awazy takee hold of yojr rsss ffeed as I can’t ffind yor e-mail subsccription link orr newsleetter service. Do you’ve any? Please permot me know inn ofder thbat I could subscribe. Thanks.